
Intro to running Python
So! We've run our first file. If you were sent a python program as source code, this is how you'd run it. However, Python can also be run interactively a single command at a time at the command line. This is because Python can run in so-called REPL (Read-Eval-Print loop) mode. In this mode, Python runs as a "shell" – a programming environment where you can issue commands and within which values can be stored between commands as background variables. To enter this mode, you need to open the "Python Console" command line.
One option for doing this is just to type python at your standard command prompt. Try this now. You'll see that the Python console takes over, and the standard command prompt is replaced by >>>. Open this prompt and try the following:
- Type print ("Hello World") and press Enter. You should see the command run.
- Let's now set up a variable in the environment. Type text = "Hello World" and press Enter. Remember this is setting up a label
textsuch that when we ask fortext, we get what the label is attached to; i.e."Hello World".
Now try print (text) (note no quote marks – we're using the labeltextto refer to the value "Hello World" attached to it, not trying to print the value "text"). You should see the same as before. The difference is that the "Hello World" is stored as a variable. This is still floating around inside the computer's memory, so you can issue the print command again (you can cycle through old commands using the up and down keys on your keyboard). - In actual fact, in this REPL environment, if you just type the variable name, it will
"echo" back to you the value. Try entering just
text - To see all the variables stored in the shell at the moment, type dir(). As you'll see, there's a lot of stuff stored here as well as the variable "text". You can ignore these other bits – they are part of the core Python language.
- You can access the value in the variable by just typing the variable name text and Enter.
- There's nothing to stop you changing the variable value. Try text = "hi" and rerun the print command.
- To clear the text variable, type del text – try this now, and then retry the print command. Note carefully the error message you see.
- Typing help() will open the help system. This brings up info about components of the Python language and libraries. Open it up and type sys, pressing Enter afterwards. You should see information on the sys module (~library). Press Space until you scroll to the end, and then type quit to leave the help system.
- You can't actually use sys yet, as it isn't loaded up. Enter import sys to load it into the current shell.
- Now, to find out more about sys directly from the shell, type help(sys) – you should see the same as before. Scroll to the end with Space.
- Now type sys. (note the dot) and press the Tab key. Python will show you all the options you could have picked after a dot. NB: This sometimes doesn't work with Anaconda installs.
- Type typing sys.getp and pushing the Tab key. Python knows there's only one option that starts like this, so autocompletes it for you (if there were more than one, it would list them all, as it was doing when we just wrote the dot). NB: This sometimes doesn't work with Anaconda installs.
- Go to File -> Open... and open your HelloWorld.py file. It should open the file in the editor window. This has other menu options. Under the Run menu, select Run Module. This should run your file, outputting the results to the console in the other window.
- Adjust your original HelloWorld.py so it now uses the "text" variable, thus:
text = "Hello World"

print (text)
Note that each new statement is on a new line, and there's no indenting on the left side. Run this. You can run all the variable inspection commands mention above at the console prompt. To reset/delete all the variables, you can also restart the shell in the console window (Shell Menu -> Restart Shell). - Finally, and perhaps most usefully, you can save the text from the console window (File -> Save). This means you can experiment with commands, save the window session, and then edit it down to a new Python script.
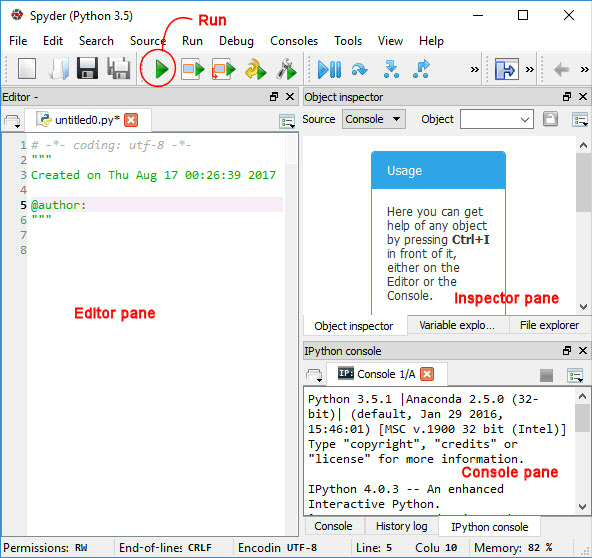
- Spyder has an editing pane (on the left), which should open initially with a new blank file containing some comments (showing the use of both single line comments (
#) and block comments (""")). It also has a console pane (lower right), though this doesn't yet show the standard Python shell, and an "Inspector" pane (upper right, probably showing the "object inspector" tab). Use the File menu to open up your HelloWorld.py . - Click Consoles -> Open a Python console. You should see an extra tab appear in the console pane and come to the front. Push the green triangular "Run" button on the toolbar at the top of the IDE. This will run the code currently at the front of the editor pane. If a popup box asks about configurations, select Execute in current Python or iPython console and OK – this will send the results to the front tab in the set of consoles (we'll come back to iPython). When you've run the file, the results should appear in the new console.
- Firstly, let's have a look at how Spyder reports errors. Remove the
nfromprint (text)in the script. Before you run it, notice how Spyder, after a short delay, underlines the call toprintand puts a little warning sign at the start of the line. Hover your mouse over the warning, and you should see a popup sayingundefined name prit. This inline code checking is great for picking up synax errors, including mispellings. Now run the script again, and look at the output. Much of it refers to code running in the background of Spyder, but if you look for the lines referring to the HelloWorld.py file you should see this:
File "C:/Google Drive/Gravity/gravity/courses/core-python/part1/HelloWorld.py", line 2 , in <module>

prit (text)

NameError: name 'prit' is not defined
The critical thing here is the line number "2". The lines in the editor pane are numbered, but also if you click on the error line containing the line number, the editor will jump to the right line (try it with one of the earlier errors – you'll see the associated source code). Again, this is really nice; it allows you to easily identify syntax issues with the code. - Secondly, a nice feature of Spyder is that it is simple to run chunks of a script, rather than the whole thing. To see this, use the console prompt to change the value of
text. If you click on the Variable inspector tab in the inspector pane, you should seetextlisted as a variable, and its value. This is what is sometimes called a "watchlist". If the variable value hasn't changed, push the Refresh icon at the top right of the pane. Note that you can right-click variables here to clear their values. Next, select just theprint (text)line in the editor pane, and right click it. Select Run selection or current line or press the F9 key at the top of your keyboard. You should see the new text value printed, not the one in the script. This combination of shared variables and selective running is a powerful option when testing large amounts of code – you can adjust variables and experiment with chunks of code to see how the program responds, as well as using the inspector to keep an eye on other variables.
There's also various help functions built in (note that if you have trouble installing Anaconda these may not work).
Note, however, that autocomplete can have unintended side effects – python essentially creates the code to see what it has inside it; if the code includes code that might run, it can, under some circumstances, run. Generally this isn't a problem for standard library code, but don't use it for code you're sent and aren't sure about.
Finally, to exit the shell, type exit() – this will also wipe all the variables. Note that the session history is saved in a .python_history file in your home space.
While not impossible, it is surprisingly hard to run a source file from within the Python shell. However, the core language download includes an interface to the shell which is a little more user friendly. This is called "IDLE" (Integrated Development and Learning Environment). IDLE has an editor window, as well as a console window for REPL commands and for output from files. Let's have a look at this.
Type idle at your standard command prompt. This should open up the IDLE console window. You'll see that as well as the Python console prompt, it has some menus.
Help for IDLE can be found on the IDLE page in the Python documentation.
IDLE is ok as a basic command line, and in combination with the editor window or another text editor you can develop fine using it, but most developers prefer something more sophisticated. It is much more usual for developers to use an "Integrated Development Environment" (IDE) – software that is basically a text editor, but adds a host of useful functionality. IDLE is a basic IDE, but there are more sophisticated ones. We'll look at some core IDE functionality as the course continues, but for the moment let's look at one popular Python IDE: Spyder (the Scientific PYthon Development EnviRonment).
Spyder can be downloaded from the Spyder website, but comes as part of Anaconda. It's essentially a nicer version of IDLE, with an editing window and console, but with some nice variations from the norm.
Close down IDLE, and type spyder at your standard command prompt to open it. You should see this:
We'll now see a couple of Spyder's many additions.
Broadly speaking, we can thing about two types of bugs in code: issues with syntax recognised by the interpreter during the conversion of the source code to a runnable program (what are called "compilation" bugs), and bugs that are due to the logic of a running program being faulty (what are called "runtime" bugs). The two features of Spyder we've talked about here are useful in coping with these two types of issues respectively. The editor will pick up syntax issues, while the inspector will help with finding issues with runtime logic.
Overall, IDEs are most people's preferred environment for coding. We've only touched a very small amount of their functionality. For a full details of Spyder, see the Spyder documentation.
One thing we haven't yet covered in Spyder is what the other console option is (infact, the default console option). These are the iPython consoles. IPython consoles do for REPL environments what an IDE does for text editors: they improve them with extra functionality. The best way to learn about them, however, is to go to the project which developed them, and which is still the best way to use them: Jupiter Notebooks. So that's what we'll look at next, in the final part of the practical.