GEOG5870/1M: Web-based GIS A course on web-based mapping
Example JavaScript programs
In the last page, we looked at a program to build a multiplication-table grid. In doing so, we looked at
a) why we might want to use onload; b) nested for loops; and c) how we
change webpages after they're on the screen.
In this page, we'll look at a program that works out the day of the week for a date. In doing so, we'll look at interacting with a form to get user supplied data.
Day of the week calculation
This example uses an algorithm called Zeller's Congruence to calculate the day of the week given any date. This example calculates from a Gregorian date, an alternative form of the algorithm can also be used to calculate from Julian Day Numbers. The Gregorian calendar was introduced by Pope Gregory XIII in 1582, and was implemented in different countries at different times; some countries did not change calender until well in to the 20th century. Note that this example makes no attempt to check that the dates entered are valid (either that the year is at least 1582, or that the user has not entered an impossible date, such as February 30th).
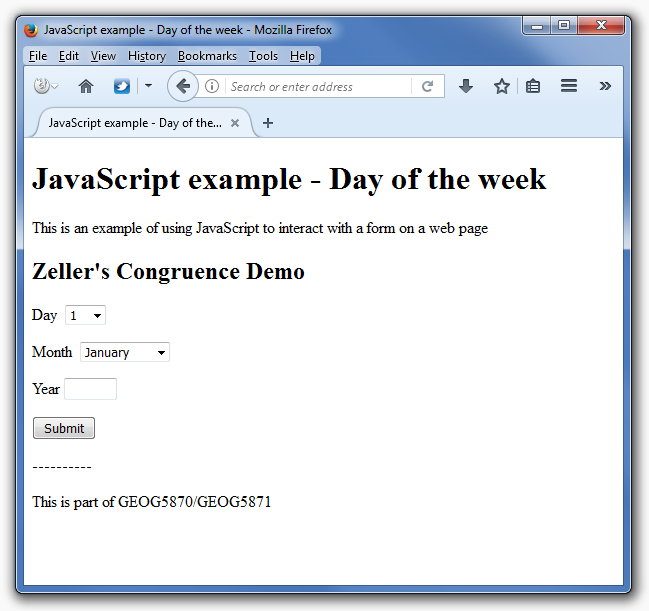
The code below again shows two files, an HTML file, and a linked JavaScript file. The JavaScript and HTML code are adapted from an example on CodingForums by Krupski. The HTML document includes a FORM element, which has a submit button, plus three input elements: two SELECT lists for the day and month, and a free text entry box for the year. The interface looks like this:
Here's the code for the webpage:
<!DOCTYPE html>

<html>

<head>

<meta content="text/html; charset=ISO-8859-1" http-equiv="content-type">

<title>JavaScript example - Day of the week</title>

<meta content="Oliver Duke-Williams" name="author">

<script type="text/javascript" src="zeller.js"></script>

</head>

<body>

<h1>JavaScript example - Day of the week</h1>

<p>This is an example of using JavaScript to interact with a form on a web page
<form>
<p>Day <select id="day">
<option value="1">1</option>
<option value="2">2</option>
<option value="3">3</option>
<option value="4">4</option>
<option value="5">5</option>
<option value="6">6</option>
<option value="7">7</option>
<option value="8">8</option>
<option value="9">9</option>
<option value="10">10</option>
<option value="11">11</option>
<option value="12">12</option>
<option value="13">13</option>
<option value="14">14</option>
<option value="15">15</option>
<option value="16">16</option>
<option value="17">17</option>
<option value="18">18</option>
<option value="19">19</option>
<option value="20">20</option>
<option value="21">21</option>
<option value="22">22</option>
<option value="23">23</option>
<option value="24">24</option>
<option value="25">25</option>
<option value="26">26</option>
<option value="27">27</option>
<option value="28">28</option>
<option value="29">29</option>
<option value="30">30</option>
<option value="31">31</option>
</select></p>
<p>Month <select id="month"> <option value="1">January</option>
<option value="2">February</option>
<option value="3">March</option>
<option value="4">April</option>
<option value="5">May</option>
<option value="5">May</option>
<option value="6">June</option>
<option value="7">July</option>
<option value="8">August</option>
<option value="9">September</option>
<option value="10">October</option>
<option value="11">November</option>
<option value="12">December</option>
</select></p>
<p>Year <input id="year" size=4></p>
<p><input type="button" value="Submit" onclick="doDemo();" /></p>
</form>
<p id="result">----------</p>
<p>This is part of GEOG5870/GEOG5871</p>
</body>
</html>
The SELECT elements offer a fixed number of options to the user, through the use of a number of OPTION elements. You should note that each of the input elements has an ID parameter, which will allow our JavaScript program to monitor their value. There are too many possibilities for the value of year to provide a fixed set of options, so the free text INPUT element is used, but as stated above, no checks for validity are made in this example.
Our form also has a BUTTON element, and we have attach an event
handler to the button. When the button is clicked, it triggers the onclick event, and we have instructed the web browser to run a function called 'doDemo()' when this event occurs.
Finally, our page has a P (paragraph) element that is given the ID
"result". As you may suspect from our previous example, this will
be dynamically modified to display the result of our program. Unlike
the times tables example, the JavaScript program does nothing when
initially loaded; rather it waits to be triggered by an event handler.
Here's the JavaScript code that is
triggered by the onclick event handler. There are three functions
defined. The last of these is the doDemo() function that is linked to the onclick event; this calls the demo() function, which,
in turn, uses the zeller() function.
Code for zeller.js:
/*

 * Code taken from example here:

 * http://www.codingforums.com/showthread.php?t=215306

*/


/* returns 0-6 where 0=sunday, 1=monday, etc....*/

function zeller(month, day, year)  {

   if (month < 3) {

      month += 12; year -= 1;

   }

   var h = (day + parseInt(((month + 1) * 26) / 10) +

      year + parseInt(year / 4) + 6 * parseInt(year / 100) +

      parseInt(year / 400) - 1) % 7;

   return h;

}


function demo(month, day, year) {

   var mons =


['January','February','March','April','May','June',

      'July','August','September','October','November','December'];

   var days =

      ['Sunday', 'Monday', 'Tuesday', 'Wednesday',

      'Thursday', 'Friday', 'Saturday'];

   return mons[month-1] + ' ' + day + ', ' + year +

      ' = ' + days[zeller(month, day, year)];

}


function doDemo() {

   var m = parseInt(document.getElementById('month').value);

   var d = parseInt(document.getElementById('day').value);

   var y = parseInt(document.getElementById('year').value);

   document.getElementById('result').innerHTML = demo(m,d,y);

}
The doDemo function uses a JavaScript built-in function called
parseInt. The parseInt function takes a
string as input, and returns a
number; we use this to ensure that the value we use is interpreted as a
number. More information about parseInt can be found at http://w3schools.com.
In order to read values from the HTML form element, we can refer
directly to the form elements using the ID values that we gave them in
the HTML page. As before, we use the
document.getElementById() method to select each element,
and then read the value property of that element (which contains the user input). Having read the
month, day and year values, the program updates the innerHTML element of the 'results' DIV, by setting its value to be the result of the function 'demo()'.
The function demo()
contains three lines of code. The first two of these simply define two
arrays, using the [] syntax. These contain lists of the names of months
and days. The final line assembles a string which will be sent back to
the calling statement (and thus used to set the innerHTML of our
results element). This string consists of the month, the day of the
month and the year as supplied by the user. Note that the user will
supply a month number from 1 to 12, whilst the mons
array, as with any JavaScript array, has an index starting at 0 rather
than 1, hence the reference in the result string to mons[month-1] –
this supplies the right label by associating January with month 0,
February with month 1 and so on. The final part of the results string
assembled in the demo function selects an entry from the days
array, which holds the names of days of the week, indexed from 0 to 6.
It does this by calling the third function defined in the file – zeller().

Equation: Zeller's Congruence (Source: Wikipedia)
The zeller() function is the one which applies the
Zeller's Congruence algorithm. The original algorithm is shown in
the equation above. It gives an answer of 0 to 6, given the inputs of day, month
and year. In the equation, the day of the week h is calculated using q, the day of the month, m the month of the year, and Y
the year. Note that – for input to the algorithm – month and year are
modified such January and February are considered to be months 13 and
14 of the preceding year (e.g. February 2011 is referred to as month 14
of 2010).
Here's the JavaScript again:
function zeller(month, day, year)  {

   if (month < 3) {

      month += 12; year -= 1;

   }

   var h = (day + parseInt(((month + 1) * 26) / 10) +

      year + parseInt(year / 4) + 6 * parseInt(year / 100) +

      parseInt(year / 400) - 1) % 7;

   return h;

}
In the JavaScript implementation, the first couple of lines are an if
statement, which applies the renumbering to month and year if
necessary. The next line implements the Congruence algorithm, again
using parseInt() to make sure variables are handled as numbers.
The final part of the algorithm uses the '%' operator, which applies
the modulus operation – which gives the remainder of an input number
when dividing by a chosen divisor.
Here's the final files; give it a go setting them up online:
Summary
These two examples have shown a few features of JavaScript. There
are many more, and we have only looked at a few methods and properties
of the Document and Window objects. However, these should provide a
good basis on which to proceed with the next set of material in this
module.