GEOG5870/1M: Web-based GIS A course on web-based mapping
Getting Started
Creating your First Google Map
Okay, so far you can access your webspace on the dialogplus server and have made a very basic index.html page. At this point I'm going to stress the importance of directory management. We will be creating lots of different files during the course of this module and therefore it is extremely important that you manage your files effectively. I recommend you create a new directory, both on your local drive and on your dialogplus server webspace for each unit of work. It's now time to create a page with Google Maps!
Copy the following text (also here) into a new file and save as google_eg1.html into a local directory and then upload it to your webspace using File Transfer.
<!DOCTYPE html>

<html>

<head>

<meta name="viewport" content="initial-scale=1.0,

   user-scalable=no" />

<style type="text/css">

   html { height: 100% }

   body { height: 100%; margin: 0px; padding: 0px }

</style>


<script type="text/javascript"

   src="http://maps.google.com/maps/api/js">

</script>

<script type="text/javascript">

  function initialize() {

   var latlng = new google.maps.LatLng(-34.397, 150.644);

   var myOptions = {

      zoom: 8,

      center: latlng,

      mapTypeId: google.maps.MapTypeId.ROADMAP

   };

   var map =

      new google.maps.Map(document.getElementById("map_canvas"),

      myOptions);

  }


</script>

</head>


<body onload="initialize()">

   <div id="map_canvas" style="width:100%; height:100%"></div>

</body>

</html>
Now try browsing to this file in your web browser to see how the file is served over the web (i.e. dialogplus.leeds.ac.uk/geog5870/web01/google_eg1.html). If you have created a new directory for this unit on your web space, don't forget to add the directory name between your personal directory name (web01) and the file name in the URL.
And if the Google Map gods are feeling kind, you should end up with this (although yours will be greyed out unless you have used an API key):
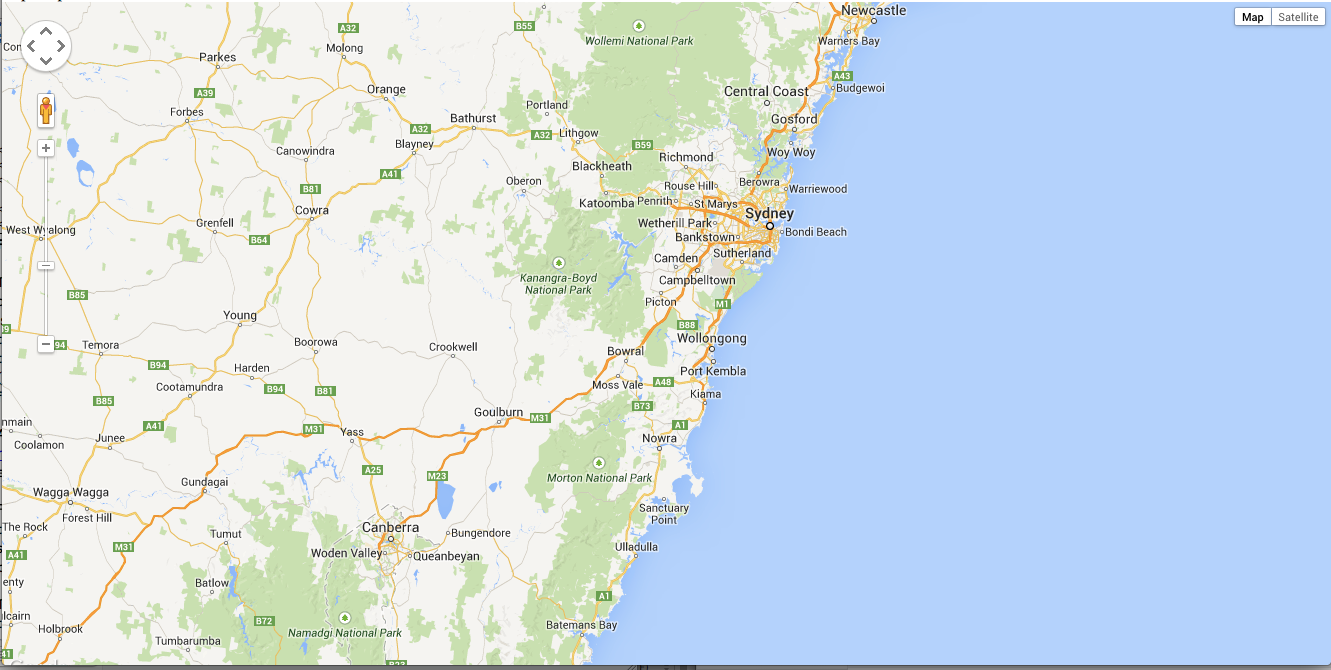
Your version of this this map, although presented in a basic manner, should be pan-able using the mouse like other Google Maps.
Organising your webspace
Before we start making some adjustments to this map, make sure that you save each version of your map under a different name so you can refer back to the working code when something breaks!
We could also do with some central location which links to all the examples. You should have an index.html that you created earlier. Edit this, and add a link to the new file google_eg1.html. One way of presenting links is as a bulleted list, thus you could create a link like this (note my file sits within the a directory 'example1' which I have added in front of the filename):
<ul>

  <li><a href="example1/google_eg1.html">First example map</a></li>

</ul>
The HTML DIV <ul> means 'Unordered list' and <li> means 'List Item'; Check this all works, and then we'll move on to making the map better.
Centring the map
Now you have your first map, let's do something with it. Let's change the default location. To do this, find the following lines of code:
var latlng = new google.maps.LatLng(-34.397, 150.644);
Notice the latitude and longitude values. This determines the default centre location of your map. These are the numbers that we will change. To do this, go to LatLong.net and input a location of your choosing. Enter these values into the code, save the code. Hit refresh – what do you see? Hopefully your map should now be centred on your chosen location.
Can you locate the School of Geography at Leeds and get it displayed in the centre of the map?
Zooming
Find the line that sets the zoom level. It should be set at "8". Change this number to a value between 0 and 20. Save and refresh. What number is the most zoomed in? What is the most zoomed out?
Changing the base map
Find the line that sets the base map:
mapTypeId: google.maps.MapTypeId.ROADMAP
You can change the MapTypeId from ROADMAP to other values. Here are the valid map types:
ROADMAPdisplays the normal, default 2D tiles of Google Maps.SATELLITEdisplays photographic tiles.HYBRIDdisplays a mix of photographic tiles and a tile layer for prominent features (roads, city names).TERRAINdisplays physical relief tiles for displaying elevation and water features (mountains, rivers, etc.).
Before moving on ensure the code you have been working on so far is named 'eg1.html' or something similar and save the next file as 'eg2.html'. I recommend you continue this practice throughout the course as a rudimental versioning system.
Adding a point marker
The following code (also here) produces a marker icon on the center of your map. REPLACE the LatLng values with the latitude longitude coordinates you used for the centre of your map.
function initialize() {

   var latlng = new google.maps.LatLng(-34.397, 150.644);

   var myOptions = {

      zoom: 8,

      center: latlng,

      mapTypeId: google.maps.MapTypeId.ROADMAP

   };

   var map =

      new google.maps.Map(document.getElementById("map_canvas"),

      myOptions);

   var marker = new google.maps.Marker({

      position: latlng,

      map: map,

      title:"Hello World!"

   });

}
It's important that this text is placed within the
initialize() function. Move it outside the function to see
what happens! Save your file and refresh. Hopefully, you should see a
marker at the centre for your map.
Adding a info window
Now we will attach an info box to the marker we have just created. This will appear when you click on it. Immediately after the code for adding a marker in, insert the new code in bold from the complete function below (also here):
function initialize() {

   var latlng = new google.maps.LatLng(-34.397, 150.644);

   var myOptions = {

      zoom: 8,

      center: latlng,

      mapTypeId: google.maps.MapTypeId.ROADMAP

   };

   var map =

      new google.maps.Map(document.getElementById("map_canvas"),

      myOptions);

   var marker = new google.maps.Marker({

      position: latlng,

      map: map,

      title:"Hello World!"

   });

   var infowindow = new google.maps.InfoWindow(

      {

         content: "I love Google Maps!"

      }

   );


   google.maps.event.addListener(

      marker,

      'click',

      function() {

         infowindow.open(map,marker);

      }

   );

}
You have now created your very own Google Map! See – there's nothing to this Google Maps malarky... Take some time at this point to try to understand what is going on. Note especially the last additions: the first passes some JSON into the constructor for InfoWindow. The second, even stranger, has a function call where the third parameter is, itself, a function – as we'll soon see, this is fine in Javascript.
[ Next: Other elements ]
[Course Index]