
Continuous integration
Continuous integration is not so much a debugging technique, but a framework for bringing together many of the techniques in a solidly managed workflow. Essentially, it is a software-enabled process by which new code can be developed, and only integrated with a project when it is working nicely. In practice, what this means is usually only merging it with a project on something like GitHub when it passes a series of Unit Tests.
There are a number of applications for helping with this. Two popular ones are Jenkins and Travis. Jenkins requires you to run your own server, while Travis uses the Cloud (i.e. it's own servers), so we'll use Travis for this practice. Continuous integration software is a subset of a larger collection of build automation tools which go back to make (list).
Essentially, Travis connects to GitHub, and whenever we push to GitHub, Travis clones our repo, and
then runs a script called
.travis.yml that we put in our repo, which tells Travis what to do. Travis builds
a virtual machine for us in the Cloud (that is, it takes resources from all over a large stock of
warehoused machines and builds in software something that looks like a single machine), which it then
uses to run the things we've asked for. These may include, for example, running Unit Test files in
our repo, or building a software release. We'll set up an example now.
For this example run-through, we'll use the LatLong repo we set up for the Code Management practice. You'll need to have worked through that first, as we'll use the repo and development branch we set up for that. Make sure the associated files work, and push the files to GitHub if you've changed them. Notice that one of the files is a Unit Test. Although you don't need to necessarily have done the associated practice it will certainly help understand what is going on. Essentially, the Unit Test file tests whether our code runs properly.
Next, sign into Travis. This involves signing into GitHub through Travis, and giving them access to your projects/email. Travis will email you test results (how to change this).
On initial login, you may find the site hangs. After a little bit, click on your name and --> Accounts. You should see your repos. If you check your email, they should have emailed you a link to a startup page.
Tick/press the slider next to the LatLong project. This will enable Travis for this repo. You can turn it off using the same control.
Now we'll add our .travis.yml. Make a blank file in the repo on your harddrive or on GitHub called .travis.yml (notice the first dot; on POSIX systems this will render the file hidden). This file will be written in a markup language called YAML, which is often used for configuration.
Add the following to the yml file:
language: python

python:

 - 3.6

script:

- python testlatlong.py
This will build our code, and then run the unit tests we've written against it.
Note that Travis builds a whole new machine to do this (this keeps things secure on their side; you'll be suprised
how fast it works). This means you can't assume anything other than the standard Python libraries are
present: it doesn't install Anaconda. If you need to add a non-standard library, add this kind of thing
to the yml:
language: python

python:

 - 3.6

script:

- python testlatlong.py

install:

- pip install -r requirements.txt
This will look at a file called requirements.txt for a list of libraries to install. This text file should be in the same directory. Here's an example that installs the library "requests": requirements.txt. The advantage of having a separate file is that you can run pip in the same way independently of Travis, should you need to (for example, building it into a .bat or .sh file for users).
Anyhow, don't add the install line at the moment; just stick with the first example yml file above.
Using GitHub Desktop, commit the files to the development branch of the repo, and push the new files up to GitHub. Then click on the repo in Travis. After a brief wait (maybe up to a minute) you should see some thing marvellous happen: Travis will build a machine; clone your repo; install Python and any libraries; and then run your tests. If you then go to GitHub and click on the "Commits" icon:

...you'll see that the commits where Travis has done tests are listed as having either passed or failed the tests with a tick or cross respectively:
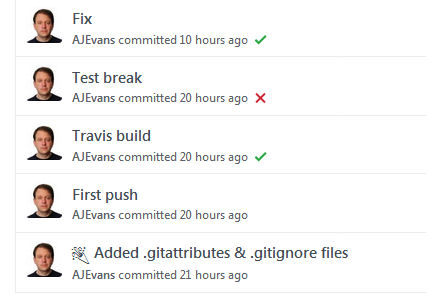
This, in itself, is super useful. It means that you can push code up to GitHub, and if you forget to run the Unit Tests, Travis and GitHub will now tell you whether the code you've pushed up is good or not. This is the kind of thing which is useful last thing in the day, when you push code up to GitHub and forget, the next morning, where you were at.
However, the real power comes with pull requests.
- This page
- Pull requests <-- Next