Spatial Interaction Modelling: Core ideas
[Practical 4 of 11 - Part 1]
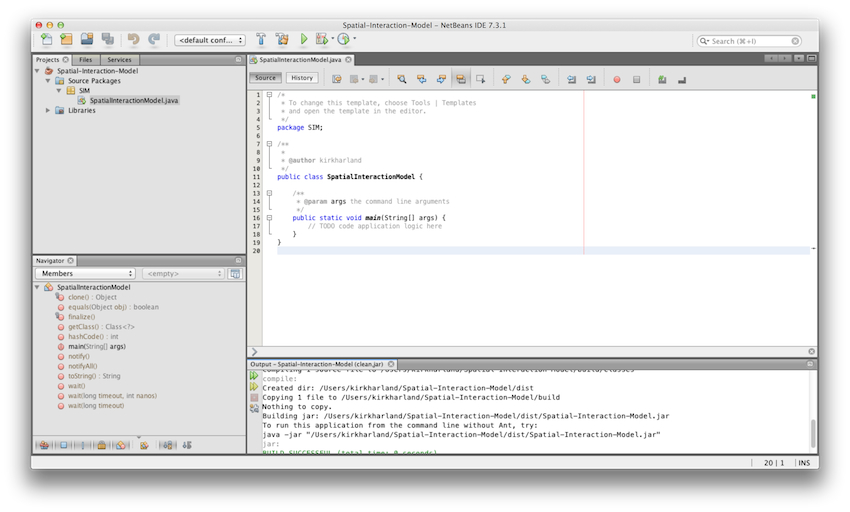
Getting Going With Netbeans:
Open Netbeans from your application list (program files on PC or applications in Finder on Mac). The icon
you are looking for should look like the one in Figure 1.

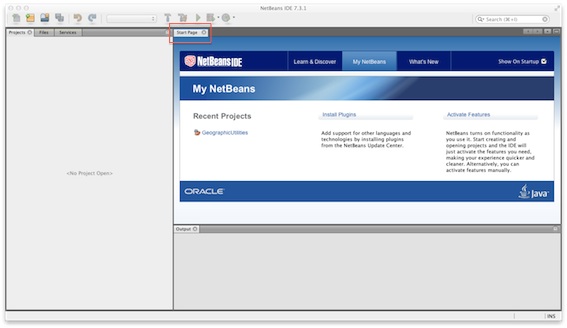
Once Netbeans has loaded you will see the initial screen which should look something like the one below,
Figure 2. Click on the cross hairs to close the start tab, highlighted by the red rectangle in Figure 2.
The next stage is to add a project into which we can add out classes. Click on the icon shown in Figure 3,
found in the top left corner of the screen or select "File >> New Project" from the menus.

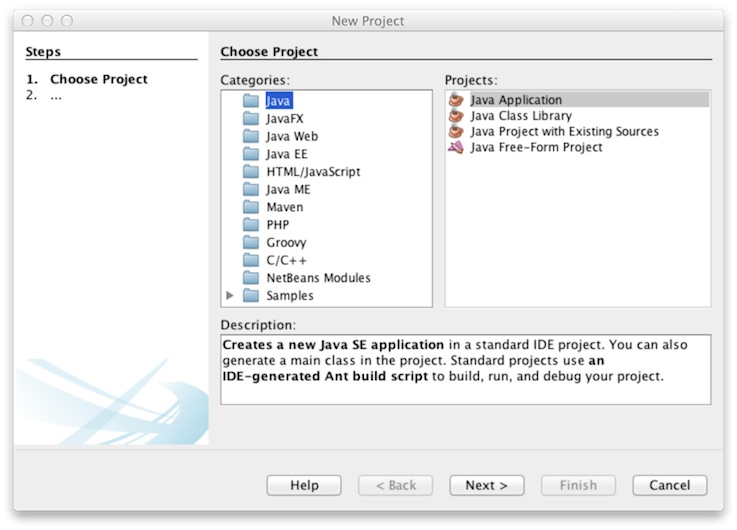
You will see a create new project wizard screen like the one in Figure 4. Select the Java
option in the 'Categories:' section and Java Application in the
'Projects:' section and then click next. Selecting the Java
option tells the IDE that you are going to be writing in Java (Java is not the only supported language by
Netbeans). Selecting the Java Application tells the IDE that this project needs to be
runnable, that means that it needs to have the public static void main (String[] args){}
construct we have come across in previous practicals.
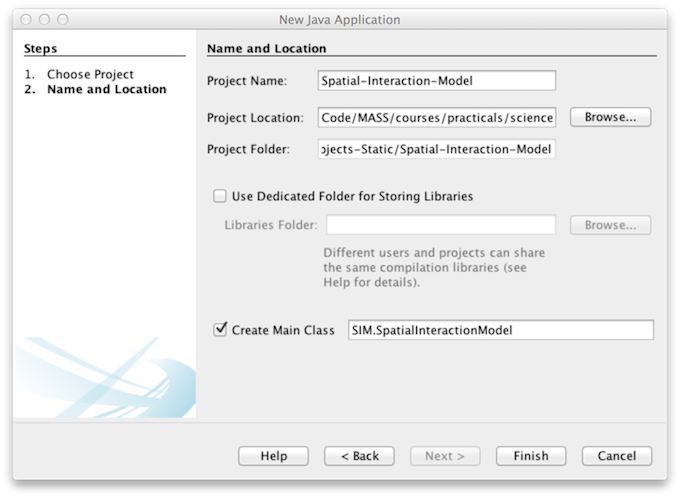
The next wizard screen asks you to select a name and location for the project, Figure 5. You can call the project
anything you like. It is advised that project names describe what you are creating in the project. Therefore,
we will call our project Spatial-Interaction-Model. Use the Browse button
next to the Project Location: input area to locate your Java folder. Make sure the
Create Main Class is checked and change the name of the main class to
SIM.SpatialInteractionModel then click finish.
The Netbeans screen should now look something like the one displayed in Figure 6. The project hierarchy
can be seen in the area in the top left of the screen. You will be able to see things like
Source Packages and Libraries displayed in the window. Don't worry about these
at the moment, we will come to what these mean and how to use them as we move through the course. The main
item of interest is that we have a file called SpatialInteractionModel.java listed in this
area.
To the right is another larger screen area where the contents of this SpatialInteractionModel.java
are displayed and can be edited directly. This window is tabbed, much like modern internet browsers,
so we can have multiple files open for edit one time. Notice that the IDE has filled out some common code
constructs for you automatically. Below this window is another window with a heading
Output, this is where the instructions we have previously seen written to the command
prompt will be displayed. Again this window area is tabbed and we will see different displays open here
as we use more advanced features within Netbeans.
Now we have a file open in our IDE which has the basic code in it to run, lets print something out to the
screen to make sure everything is OK before moving on to the next section where we will create our spatial
interaction model. Type the line System.out.println("Hello world!"); into the text editor
area of the screen below the comment // TODO code application logic here.
A useful shortcut is to type sout and press the tab key and the code will expand into
System.out.println(""); all you need to do is type in the text you want to display.
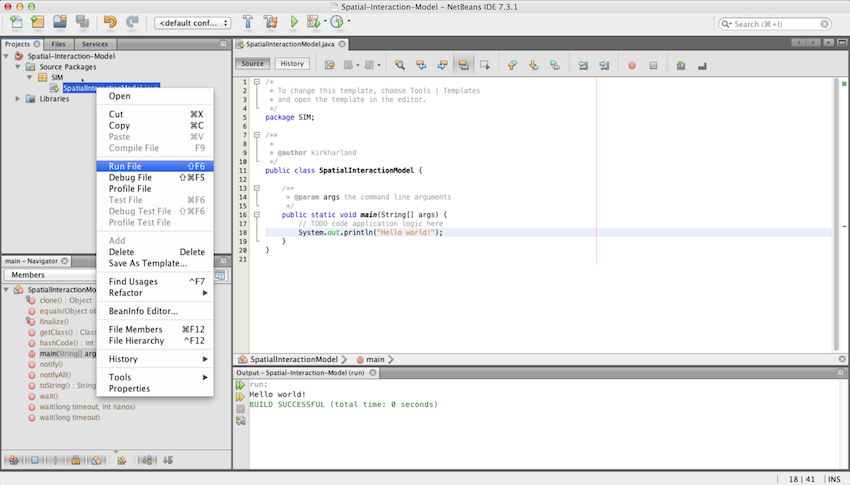
Once you have done that right click on the SpatialInteractionModel.java file in the project
area of the screen and select Run File as shown in Figure 7.
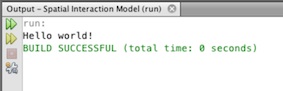
The Output area of the screen, below the text editor, should now display something similar to what can be seen in Figure 8. Although, it seems that we are not using all of the command line prompts we used in previous practicals, we are, it is just the IDE is hiding a great deal of the complexity from us. IDEs do make our lives easier, but having a firm understanding of the background processes will be invaluable in the future.
Basic Spatial Interaction Model Theory:
Spatial interaction models are used to simulate or predict the interactions between origins and destinations. These interactions are generally referred to as flows and can represent goods, information, money or people.
A spatial interaction model consists of measures of origins, a measure of destinations and a representation of the distance between each origin and destination. The pioneering work on spatial interaction models was undertaken in the 1850s and was based on the contemporary scientific theory of interaction between physical bodies in space, Sir Issac Newton’s Theory of Universal Gravitation. This theory states that the interaction between two bodies is directly proportional to their mass and indirectly proportional to the distance between them.
There are many different kinds of spatial interaction model. Some of the most famous follow the family of models developed by Sir Alan Wilson. These models are widely published and referenced, here are a selection of references to his original papers and explanatory notes please feel free to explore these further.
- Senior, M. L. (1979). ‘From gravity modelling to entropy maximizing: a pedagogic guide’. Progress in Human Geography 3(2):175 – 210.
- Wilson, A. G. (1967). 'A statistical theory of spatial distribution models'. Journal of Transportation Research 1:253 – 269.
- Wilson, A. G. (1970). Entropy in Urban and Regional Modelling. Pion, London.
- Wilson, A. G. (1971). 'A family of spatial interaction models, and associated developments'. Environment and Planning 3:1 – 32.
The model form we will implement here following Wilson is an origin constrained model:

Where
 is the estimated flow between origin i and destination j
 is the mass of origin i (population, money etc)
 is the attractiveness factor associated with destination j (size of shopping area etc)
 is a function to replicate the cost of travelling
between origin i and destination j
is a function to replicate the cost of travelling
between origin i and destination j
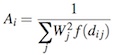 is the balancing factor ensuring the origin
constraint is correctly applied
is the balancing factor ensuring the origin
constraint is correctly applied
The equations look much more complex than they are, and they are not the focus of the practical so please don't be distracted by them they are included for completeness. The main thing to consider for this practical is how we translate this model into practical implementable code?
The first thing to do is to put comments in your code of how the processing will flow. What do we need to do to get the model to work? Each time we get a comment we ask a question again, what do we need to do to make that happen. We keep doing this until we get to the finest level we can and before we write a line of code. All of this analysis is completed in comments!
Spatial Interaction Model Design:
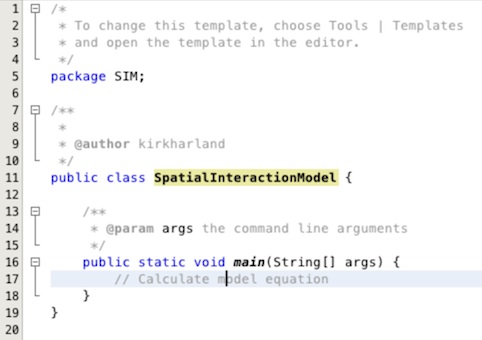
OK so lets do just that. The first thing we can put in is that we need to calculate the model equation.
So replace the lines we currently have in the SpatialInteractionModel.java that print to the
screen with some useful comments. The first one is calculate model equation, Figure 9.
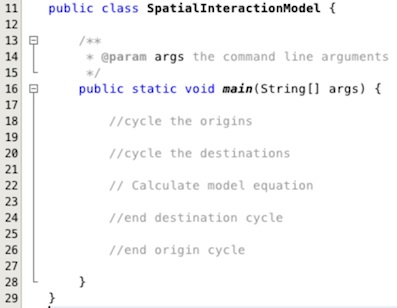
The next thing that makes sense to put in is that we need to cycle through the origins and the destinations. To get to the values for each origin and each destination and the distance between the two we need to be able to cycle through the values. So lets add another two comments:
- //cycle the origins
- //cycle the destinations
- //end origin cycle
- //end destination cycle
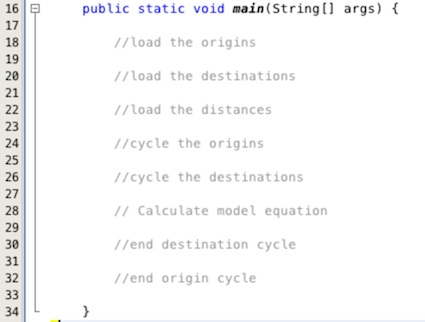
To be able to cycle the origins and destinations we first need some data. So before the cycles start we will need to load some. We not only need origin information and destination information but also information on the distances between the two. So we need three comments, Figure 11:
- //load the origins
- //load the destinations
- //load the distances
There is one more set of comments that make sense to put in. This is to calculate the balancing factor Ai in the equations above. Contrary to how the equations are presented, it makes more sense to calculate the balancing factor before the actual model equation and not at the same time. There is only one A value for each origin i. To maximise efficiency we can calculate the A values as we cycle through the origins, directly before applying it in the model equation.
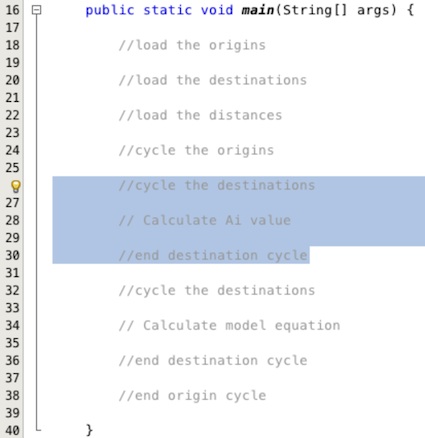
Therefore the final comments to put in are for another cycle of the destinations to calculate the A value for each origin immediately before the cycle for the model equation as shown highlighted in Figure 12.
- //cycle the destinations
- //calculate Ai Value
- //end destination cycle