Building websites
One of the great things about GitHub is that it will host webpages for you for free.
Not only can you build personal pages, line online portfolios and blogs, but you can build pages for specific analysis projects, linking code, data, and visualisation all in the same place; see, for example, this page which tracked Iceland's last volcanic eruption in real time.
Such pages can be associated with you/an organisation or a specific project. You just have to match the GitHub use guide. Your
URL will be either name.github.io, for you or an organisation, or username.github.io/projectname, for a project.
We'll see in a bit how you build content for a site. The first thing, however, is to decide where to keep the associated files.
If you want a personal or organisation website, you need to make a repo called name.github.io in your personal or organisation space, where name is your username or the name of the organisation. Anything you then put in the master branch of this repo will then contribute to the website.
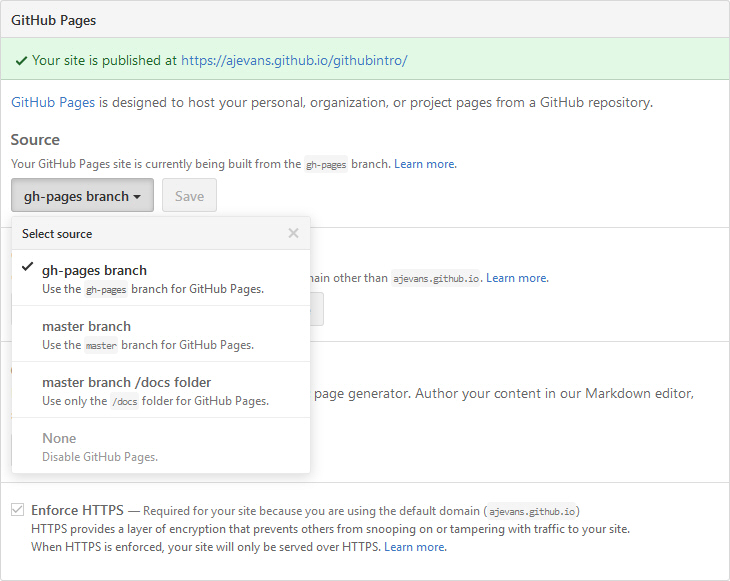
For a project website, you have more choice – you can either use the master branch (but then everything in there is part of the website), specify a directory called docs within the repo as the source, or make a new project branch called gh-pages as the source (this is the traditional way, but a docs directory is simpler if you don't want to fuss with swapping between branches). We haven't talked about branches much, as they tend to be used for large projects, but if you want to set one up, there are instructions on this page. To set up which you want to use for a project, there are options under the project Settings (see picture).
Notes:
Note that as soon as you create a name.github.io repo or gh-pages branch, your website will be live, though an attempt to look at it will fail as there's nothing in it at the moment.
Note also that in order to get GitHub Desktop to recognise a new docs directory in the repo on your drive, you may have to put a file in it. Put an empty text file called index.html in there, as that's the name of default website pages.
Let's make a personal website. Using what you've learnt, make yourself another directory on your drive called m:/ldss/name.github.io (where "name" is your username – note that you don't need to capitalise it if you don't want if your username contains capitals), and make an associated repo with the same name. Publish the repo (remember that you need to use the little blue triangle on the publishing dialog to say you want it in your area).
Now let's make some simple content. The default name for the default page on any website is index.html. Make a text file called this in your new repo, making sure your editor saves as text format, and doesn't call it index.html.txt.
Edit the content to match the following:
<HTML>

<TITLE>

Test

</TITLE>

<BODY>

Hello world

</BODY>

</HTML>
We'll explain this in a second. For now, save the file, commit and push it to GitHub. Then go to the URL https://name.github.io, where name is your username. You should see the text "Hello world", and if your browser displays a title on a tab or at the top of the browser, it should say "Test". Congrats, your website is live!
Notes:
You can use capitals or not, as you like when visiting the site – it'll work either way for the main address. However, the URL of projects etc. under it need capitalising properly. So, if you have a site for a repo "project"
https://name.github.io/project will work as well as
https://Name.github.io/project, but
https://name.github.io/Project will probably fail because the repo is in lower case.
Note that the full address of your file is:
https://name.github.io/index.html
but index.html is the default file sent out by webservers when a filename is missing, so we can miss it off.
We've used "Hello world" here, as it is a tradition for coders. Programmers usually start with showing "Hello world" on a screen as their first program, as it's the simplest way to tell a program has run.
The code you've added above is in a language called the "Hypertext Markup Language", or "HTML". It is the language all websites are made from. A hypertext is a text that can be linked with other pages (in the case of HTML through clickable links). You can find a brief introduction to HTML and writing webpages here (this will also talk about how you can set up pages on the Uni webserver – but the disadvantage with those is they disappear when you leave the Uni).
Handcrafting your own HTML site definitely gives you the most control, but it is quite an art. GitHub offers a couple of quick solutions instead. The first, for relatively simple websites, is to write them in "markdown". Markdown, which we saw when we talked about Readme.md files is a simple text formating language. Try adding a file to your repo called index2.md, editing in the following content:
---

title: Test

---


Hello World
Push it to the repo, and then visit:
https://name.github.io/index2.html
You should see that GitHub has turned the markdown file automatically into HTML for you. If you look on GitHub's website for your repo, you'll see that it does this without creating a perminant HTML file.
You can find a brief tutorial on writing markdown on this GitHub page.
The second way GitHub makes things easier is with their "automatic page generator". You can find this in the Settings for any repo, including your new one.

</HEAD>" alone, it should
keep looking nice.
That's it! Have a play, and try some stuff out. Add some text, and maybe a link to your other repo so people can download your exciting text file! This is a great space for storing work you want to distribute, building up a portfolio of analysis work, code, data, or whatever. Although we filtered out Office files earlier, you can always put them on your Uni webpages (see the HTML tutorial) and link to them there for the moment (you can stick them on GitHub, but they don't work well there, and it's kind of frowned on). You can certainly add images for your webpages though. For larger files that aren't text, GitHub have added a service, but it is mainly for code releases.
If you want to really dig into the capabilities of GitHub, you should check out Jekyll, which is a website-building tool that lots of people use with GitHub, and which is well integrated. It is especially good for blogs, which GitHub will store. More info here.