
Keeping track of changes
We'll now look at using Git to track file changes locally.
There's a lot on this page, but it is mainly setting up the software and some files.
Once you've set up an account, exit the GitHub website and set up a directory structure for the practical. For consistency we'll assume it is m:/GEOGXXXXX/githubintro, where XXXXX is your course code (if you're doing this practical as part of a course), and m is your harddrive letter (on home PCs this will probably be c; on Macs, use your home space).
Notes:
If you're not sure how to make a directory, what m:/GEOGXXXXX/githubintro means, or how to save the file, see these tutorials on
directories,
Windows Explorer/Mac File Finder, and
browsers.
Next, we need some software to work with Git, and communicate with GitHub. There's lots of choices for Git client software, but we're going to use the GitHub Desktop app.
The GitHub Desktop app only works with GitHub, but is a really well thought through app which makes using GitHub very simple. Download and install it from the GitHub Desktop site.
You'll see it installs a purple Octocat icon to your desktop.
Notes:
If you are installing it in our labs, GitHub Desktop will install without admin rights, but unfortunately will install in the user space on the local "c" drive, rather than your "m" drive. This is fine, but you'll need to install it separately on any machine you use and it might get wiped between logins. You won't lose anything if it is wiped: your repositories will be elsewhere (provided you follow our instructions).

Open up GitHub Desktop, and log in. If this is the first time you've run it, it will ask you to confirm some details (if it asks but won't let you do it, just 'skip'). You should then see something like this (you can click the image for a large version)...

Click the "Create new repository" button, and fill in the following details (in this order):
Name: githubintro (as you type this, it will appear as a new directory in the Local path, matching the directory that already exists in GEOGXXXXX).
Local path: browse to, and select, the GEOGXXXXX directory you made, above (NOT the
githubintro directory)
Leave everything else as it is.
Push Create repository.
If you now use Windows Explorer to look into the githubintro directory, you'll see it has created a bunch of git repository stuff.
Notes:
These files are the mechanics of Git. It's important to understand that Git only saves changes, rather than whole files, which means there isn't some directory somewhere where it backs everything up – if you want to return to an older version of the file, you have to recreate it using Git. This keeps the space used by the versioning part small.
Going back to GitHub for Windows, You'll see the new repo added. The screen should look something like this:

We're now going to add some files. Save this zip file in the githubintro directory. Unzip it in the directory ("Extract here" in most zip software) and delete the original zip file. It should unzip to a text, Excel, and Word file – the latter in its own directory.
The file we're interested in is the text file, which represents the code or data we want to use with Git. We're going to use Git to filter out the Word and Excel files. Git doesn't work well with Word, Powerpoint, Excel, etc. Once you get used to GitHub you'll see the limitation isn't a major one; almost everything we want to deal with in Git is text.
Don't let your zip software create a new githubintro directory inside the old one. Your files should be:
m:/GEOGXXXXX/githubintro/text.txt
m:/GEOGXXXXX/githubintro/excel.xlsx
m:/GEOGXXXXX/githubintro/word/word.docx
Note that there's a difference between a text file and a file containing text and other stuff. A text file contains just text in a simple format, whereas, for example, a Word file contains text, but it is stored in a much more complicated format than a standard text file and can include all kinds of images etc. Code, and most data these days, is stored as text files in the strict sense – there's nothing else in them, and the file format is relatively simple.
If you now look ta the Changes tab in GitHub Desktop, and you should see this:

A few things to note.
- Any files that are new or changed are listed here under Changes. As we've just set up the repo, everything is listed.
- The Summary box contains space for a Summary. This is a bit of text that will allow everyone to recognise the version you commit to the repo. At the moment, we've changed stuff, but we haven't committed it, so we can't undo the changes later.
- Compare the details listed under History (the first screenshot) and those under Changes. The history lists .gitattributes a file that has been created. This has been committed by the system, so appears as a historical save, and doesn't appear under current changes.
We're now going to exclude the files we don't want. We'll do this by setting up a .gitignore file. This filters out files/file types that we don't want to commit or push to the GitHub repository. We're now going to use this to filter out our Excel file and our directory of Word docs.
Click on the Repository menu, and select Repository settings... --> Ignored files. This is an editor for .gitignore.
At the very top of the file, add:
*.xlsx

word/
This will filter out all .xlsx (Excel) files and anything in a word directory inside the githubintro directory.
Press Save to save the file and go back to the Changes screen. You should notice that the .xlsx file and the word directory have disappeared (if they haven't, just unselect them – the software can take a while to catch up). You should find that nothing you place in the word directory will appear. As it happens, you can also add files and file types by right/control-clicking them as they appear in Changes, but the gitignore editor allows you greater control over, for example, directories.
Notes:
Note that if you are working with
others, you can also add .gitignore and .gitattributes to the .gitignore, if you want
each person to have their own .gitignore, rather than pulling it from the repo. Just list the filenames with no asterisk (the asterisk in *.xlsx just means "all files of this type" in this context – it is a wildcard that can
be replaced with anything).
Having made that change, we'll now commit our remaining file to the local repo.
On the Changes screen, type into the Summary box, "Start" and press the Commit to Master tick.
If you then go to the History screen, you'll see an new entry for the commit you've just done.
Now open "Text.txt" in a text editor, change "world" to "globe", and save the file.
If you now go back to GitHub Desktop and Changes, you should now see the file is displayed as changed.
Click on the file, and you should see the changes you've made (if you can't already).
Type "Changed a word" in the summary box, and commit the change.
Notes:
Classic text editors for creating and editing simple text files are Notepad and Notepad++ on Windows, and TextEdit on Macs. However, a couple of notes need to be made: first, always check the file type of what you are saving – some programs save as more complex formats like RTF as well (indeed, TextEdit does by default – see how to change this). Secondly, always check your file extension is what you're expecting – some editors can add ".txt" to the end of text files, whatever you'd rather have (and you don't have to stick with .txt for text files – CSV files are text files). This is especially problematic with Windows, which will hide file extensions (it is worth turning this off).
If you then go to the History screen after committing and click the "Start" commit, you'll see a seven character name (circled below). This is the first seven characters of a "hash code" (unique representation of the version) that acts as a definitative name for it. This can be used in some of the more complicated git commands, so it is worth recognising.

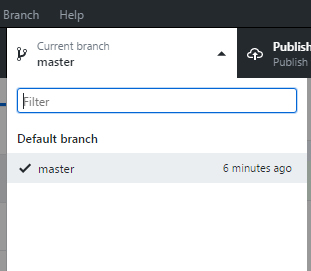
Repos can have multiple "branches", as we'll see. Each branch is an independent copy of the code, copied off at some point of development, the idea being for a team to work on a specific branch to build a key part of a project (for example "the database bit" or "the frontend the user sees") while having a copy of the code that was branched off when it was all working in some simple fashion. Once everyone has built their bit, the branches can be "merged" together to make the full and finished program. At the moment, we've been updating the "Master" branch. This is the main branch of the project. If you want to make a new branch, options exist under the Branch menu. To swap branches, see the drop-down list currently labeled "Current branch master". This isn't especially common in small projects, but we'll come back to it when we look at making a website as that involves making a new branch.
If you want to undo this last change, go back to the commit list under History, right/control-click the last commit and select "Revert this commit". This will create a new commit with the changes undone, "rolling back" the file/s changed. Note that you can revert back through a series of changes, but you have to do them one at a time, working backwards in order, starting with the last thing in the history.
Reverts, it has to be said, can be a little hit or miss. Any issues, see this troubleshooting page, but we'd recommend only using revert when you really need to.
Notes:
Remember, if the file is open in your editor, the version may be different from the rolled back version. Some editors will roll back as well: Notepad++, for example, will ask if you want to reload it because changes have been made (or it may do it automatically, depending how it is set to respond under Settings --> Preferences --> MISC --> File Status Auto-Detection).
Note, also, that this is just a versioning system – it doesn't prevent your files being lost if the directory is destroyed (indeed, reverts can be a bit hit and miss). You should always back up your files regularly as well. We'll see how to do that on GitHub next, but it is also worth backing up to another location as well.
Finally, note that while you have to work backwards through reverts, you can reorder the reverts list using "rebase". This is complicated, but you can find more details here.
In the dark area of the GUI, you'll see another icon, an arrow into a cloud, labelled "Publish". This is what we're going to now use to to push our code to GitHub.