
Pushing to GitHub
We're now going to push our changes up to GitHub. This will allow us to work with others on the project, but also allow anyone to download a copy our files. Before we can start pushing, though, we need to publish out repo on GitHub.
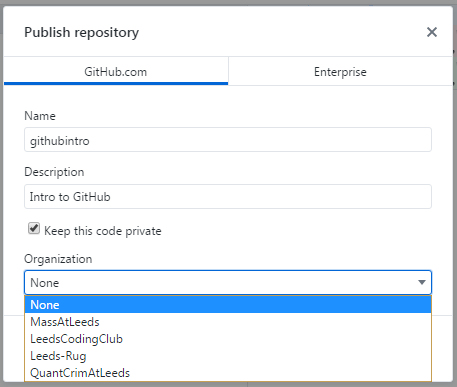
Push the Publish icon and fill in a description. Choose the GitHub area to save to using the drop-down list (you'll probably only have "None": your personal area, but you can see on the picture that organisations can appear here if they have areas and you're a member). Unclick "Keep this code private" if it is clicked on. Then push Publish repository and wait for it to finish. Note that once you've published the first time, this button will change to say sync.
If you then click on the Repository menu --> View on GitHub, it will open GitHub in your web browser and you'll see your new repo online.
It will open on a screen showing the latest commit. You can push the "Code" tab on the webpage to view this if it doesn't. This version is sometimes called the "origin", as it is the source code other people will pull down if they want a copy of your files. The page should also tell you how many commits have been made so far and store those commits. If you click on the statement of the number of commits (it has a little clock icon), you'll see this store of commits.
Note that because files are public, we wouldn't have to log in to see them or the commits.
If we do log in, however, we get some extra options:
- the option to delete files (Code tab --> click on filename --> Trashcan icon). This is a useful option if you've accidentaly uploaded a file you didn't mean to (though see the next page for more on this).
- You also get access to the Settings tab. Under this, you can change Restrict editing to collaborators only. The default is to restrict: the code is public, but people can only pull the code down, not push new code up. If you leave this restriction in place, you have to add collaborators (see the menu on the left of the Settings page – we'll try this shortly). If you turn it off, anyone can edit anything. This isn't advisable, as it opens you up to people contaminating your software with malware etc. Under Settings you can also delete entire repos.
- On the Code tab, you can also add and edit a "Readme.md" file describing the project. This is written in "markdown" – a very simple text-and-formating language
Login (if you aren't logged in already) and add a Readme using the website. Remember to push the Commit changes button at the bottom of the editor that opens in the webpage. We'll pull this Readme into our local repository next.
Go back to GitHub Desktop and you'll see the publish button is now "Fetch origin". Push this and wait for it to finish. You'll see that one file is waiting to download. Push the button again (it has changed to "Pull origin"). This button pushes changes to GitHub if you have any, and pulls down changes if need be. The Readme.md file should appear in the history, and you should be able to see it in the githubintro directory on your machine using Windows Explorer/File Finder.
Notes:
If you're working with other people on a project, it is worth syncing with GitHub regularly. We'll see how to deal with conflicts in files shortly, but whenever you're working with others, sooner or later someone will alter something you're also working on, and such "conflicts" need resolving. The more you sync, the less conficts you get in a given file at a time.
Note that as you build up repositories, if you want to use them on another machine, you just open up GitHub Desktop on the other machine, login to it, and all your repos on GitHub will be listed under "File" --> Clone repository. You can clone them by clicking on their name and clicking "Clone" – you can change where you save it by adjusting the Local path.
Obviously if you make changes on your second machine, you'll need to push the changes to GitHub and then pull them down onto the first machine if you want to start using that again.

That's it for setting up your own repository. But what if you want to pull down someone else's? That's what we'll look at shortly. First, however the most important thing to remember about GitHub.