Arc ModelBuilder
The next practical in the lecture series will involve making a small "Hello World" button for ArcMap, and then getting this to run a tool built into ArcToolbox. We could use a standard tool for this, however this is a good opportunity to also play with Arc's "modelbuilder" programming interface, if you haven't already done so.
ModelBuilder is how non-programmers would make basic Arc programs, using the functionality built into Arc. It's actually a really nice bit of software, and probably the best example of a fourth-generation drag-and-drop coding environment there is; you can build up some quite sophisticated models with it. With that in mind, this practical walks you through making a basic model using modelbuilder. We'll then run this programmatically, using it as a built-in tool, in the next practical. Don't worry - it's actually easier than building the model itself!
NB: for each task, read down to the next dotted line before trying to do the task.
First, open up ArcMap with a blank map. For this practical, we will be visiting a scene of terrible devastation in popular British TV location Albert Square. Similar to the ModelBuilder practical in GEOG5510: Using GIS. We'll be building a buffer and intersect tool. We're going to assume a bomb has gone off within the square, and buffer the explosion area. We'll then intersect this with the buildings to find out which are destroyed. With this in mind, download this zip file and unzip it somewhere on your M drive. For the sake of this practical, we'll assume it is unzipped (without an "albertsurface" directory) to m:\GEOG5790M\practical1\. Inside are a series of .e00 files. Note that you might have to mount the m: drive to see it.
Convert them to coverages using ArcToolbox -> Conversion tools -> To coverage -> Import from E00 (if this is missing, a similar tool can sometimes be found under ArcToolbox -> Coverage Tools -> Conversion -> To Coverage -> Import From Interchange). Use the default locations. Once created, import the new coverages into ArcMap using "Add data" or similar. Note 1: Add the Buildings FIRST (this will help as these has a well-formed geography associated with them). Note 2: don't worry if Arc complains they are missing a spatial reference -- we only want some example data. Once you've done this, save your map in the same directory.
NB: ArcGIS doesn't like the fact that the m: drive is actually a 'mapping' (i.e. a link) to a drive on another machine. If you look at the directory when you select the e00 file, you'll see it is something like:
\\ds.leeds.ac.uk\blah\blah\you\GEOG5790M\practical1\build.e00
Arc really doesn't like the first bit of this, which you'll recognise as a server address.
If you run this, you'll probably come back with a bunch of errors -- try it so you can see what these are like.
In older versions of Arc, you can just change this location to:
m:\GEOG5790M\practical1\build.e00
And it will run. However, since they reimplemented everything as Python scripts, this seems to be even
more broken. The solution is to set Arc so it uses the m: notation and believes that is where it is running. The simplest way to do this seems to be to set the current workspace using this notation. The 'workspace' is a bit of old Arc stuff from the command-line ArcINFO days that still runs deep in the guts of Arc. It is basically the working directory, though it doesn't need to be where the files are any more. To set this, open the import dialog, and click the Environments... button at the bottom. Click Workspace, and set both workspaces to m:\ArcGIS\Default.gdb. You should then see that when you select the e00 file, it shows using the m: notation. More importantly, the import should now work. Unfortunately, you have to set this each time. What can I say -- I know you'd write it a good deal better.
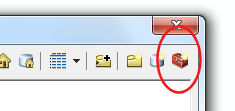
Next we'll add a Toolbox. If you can't see ArcToolbox, click on the Toolbox icon, as shown in the red circle, below.
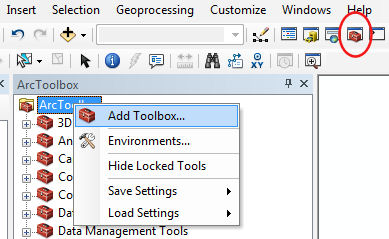
Right-click on the ArcToolbox root icon (as above), and select Add Toolbox.... This will bring up a FileDialog. Navigate to m:\GEOG5790M\practical1\ and then click the little Toolbox icon in the top right corner of the FileDialog (see below). This makes a new Toolbox.
NB: you may find that you need to connect to the folder to see it. To do this, use the icon that's a folder with a little "+" symbol on it. After you've connected to a folder with this it will appear under "Folder connections" in file dialogs.
Change its name to Models.tbx and then select it. Press Open. This will add the new toolbox to ArcToolbox. It should appear alphabetically listed.
NB: you may find that renaming one toolbox appears to rename them all. Don't worry, I think this is just a display bug. If you cancel the dialog and re-open it, the new Toolbox should be there, renamed, along with the other/s with their old name/s.
When you've done that, go on to Part Two, where we'll make the model.